How Do I Remotely Connect To Raspberry Pi From SSH? A Comprehensive Guide
Connecting to your Raspberry Pi remotely using SSH (Secure Shell) is a powerful way to access and control your device from anywhere in the world. Whether you're a developer, hobbyist, or professional, understanding how to set up and use SSH is essential for managing your Raspberry Pi projects effectively. With SSH, you can securely interact with your Raspberry Pi without needing physical access to the device, making it an indispensable tool for remote computing.
This guide will walk you through the entire process of setting up SSH on your Raspberry Pi, configuring it for remote access, and troubleshooting common issues. Whether you're new to Raspberry Pi or looking to enhance your remote computing skills, this article will provide you with everything you need to know to get started.
As you delve into this guide, you'll discover practical tips and best practices to ensure your connection remains secure and reliable. By the end of this article, you'll have the confidence to remotely connect to your Raspberry Pi from any location, empowering you to take your projects to the next level.
Read also:Hector Lavoe Net Worth The Voice Of Salsas Untold Story
Table of Contents
1. Introduction to SSH and Raspberry Pi
2. How to Enable SSH on Raspberry Pi
3. How to Connect to Raspberry Pi via SSH
4. Configuring SSH for Enhanced Security
5. Common Issues and Troubleshooting
6. Alternatives to SSH for Remote Connections
Read also:Anja Ravello The Rising Star Whorsquos Redefining Fashion And Beauty Standards
7. Advanced SSH Features for Raspberry Pi
8. Security Best Practices for SSH Connections
9. Frequently Asked Questions (FAQs)
Introduction to SSH and Raspberry Pi
SSH, or Secure Shell, is a protocol designed to provide secure communication between two computers over an unsecured network. It encrypts all data transmitted between your local machine and the Raspberry Pi, ensuring that sensitive information remains protected from unauthorized access.
Raspberry Pi, a compact and affordable single-board computer, is widely used for a variety of projects, from home automation to robotics. By enabling SSH on your Raspberry Pi, you can manage and control it remotely, which is particularly useful if the device is located in a different room or even in a different country.
Using SSH not only simplifies remote access but also enhances productivity by allowing you to execute commands and transfer files directly from your local machine. This guide will cover everything you need to know to set up and use SSH effectively with your Raspberry Pi.
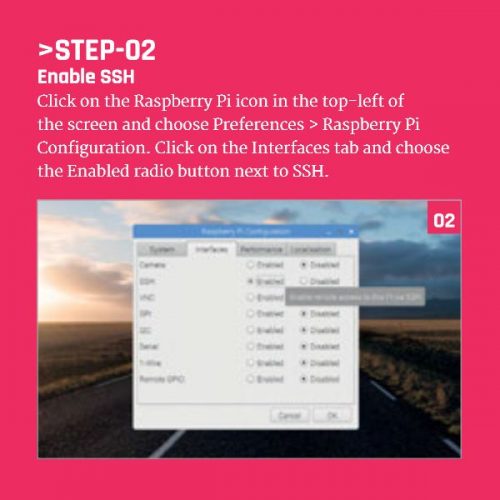
How to Enable SSH on Raspberry Pi
Step 1: Check SSH Status
Before enabling SSH, it's important to verify whether it's already active on your Raspberry Pi. You can do this by opening the terminal and typing the following command:
sudo service ssh status
If SSH is already running, you'll see a message indicating its active status. If not, proceed to the next step to enable it.
Step 2: Enable SSH Using the Raspberry Pi Configuration Tool
One of the easiest ways to enable SSH is by using the Raspberry Pi Configuration tool. Follow these steps:
- Open the terminal on your Raspberry Pi.
- Type
sudo raspi-configand press Enter. - Select "Interfacing Options" from the menu.
- Choose "SSH" and enable it.
- Reboot your Raspberry Pi to apply the changes.
Step 3: Enable SSH by Creating a File
If you don't have access to the graphical interface, you can enable SSH by creating a file named "ssh" (without any extension) in the boot directory of your Raspberry Pi's SD card. Simply insert the SD card into your computer, create the file, and insert the card back into your Raspberry Pi. Upon booting, SSH will be enabled automatically.
How to Connect to Raspberry Pi via SSH
Using PuTTY on Windows
For Windows users, PuTTY is a popular SSH client that allows you to connect to your Raspberry Pi. Here's how you can use it:
- Download and install PuTTY from the official website.
- Open PuTTY and enter your Raspberry Pi's IP address in the "Host Name" field.
- Set the port to 22 (default for SSH) and click "Open."
- Enter your Raspberry Pi's username (default is "pi") and password when prompted.
Using Terminal on macOS/Linux
On macOS and Linux systems, you can use the built-in terminal to connect to your Raspberry Pi via SSH. Follow these steps:
- Open the terminal and type the following command:
ssh pi@- Enter your Raspberry Pi's password when prompted.
Configuring SSH for Enhanced Security
While SSH provides a secure method of remote access, it's essential to configure it properly to minimize security risks. Here are some tips to enhance your SSH setup:
- Change the Default Port: Modify the default SSH port (22) to a non-standard port to reduce automated attacks.
- Disable Root Login: Restrict root access to prevent unauthorized users from gaining administrative privileges.
- Use Key-Based Authentication: Replace password-based authentication with SSH keys for added security.
Common Issues and Troubleshooting
Issue 1: Unable to Connect to Raspberry Pi
If you're unable to connect to your Raspberry Pi via SSH, ensure that:
- SSH is enabled on your Raspberry Pi.
- Your Raspberry Pi and the connecting device are on the same network.
- You're using the correct IP address and port number.
Issue 2: Permission Denied (Public Key)
This error usually occurs when key-based authentication is misconfigured. Double-check that:
- Your public key is correctly added to the
~/.ssh/authorized_keysfile on your Raspberry Pi. - The file permissions for the
~/.sshdirectory and its contents are set correctly.
Alternatives to SSH for Remote Connections
While SSH is the most widely used protocol for remote access, there are other options available depending on your specific needs:
- VNC (Virtual Network Computing): Provides a graphical interface for remote access.
- TeamViewer: Offers an all-in-one solution for remote control and file sharing.
- Web-based Interfaces: Some applications provide browser-based access to Raspberry Pi services.
Advanced SSH Features for Raspberry Pi
Once you've mastered the basics of SSH, you can explore advanced features to further enhance your remote computing capabilities:
- Tunneling: Use SSH tunnels to securely access services running on your Raspberry Pi.
- Port Forwarding: Forward specific ports to allow remote access to applications running on your device.
- SSHFS: Mount remote file systems securely using SSH.
Security Best Practices for SSH Connections
To ensure the security of your SSH connections, follow these best practices:
- Regularly update your Raspberry Pi's operating system and SSH software.
- Use strong, unique passwords or passphrase-protected SSH keys.
- Monitor login attempts and configure fail2ban to block repeated failed login attempts.
Frequently Asked Questions (FAQs)
Q1: Can I connect to my Raspberry Pi via SSH over the internet?
Yes, but you'll need to configure port forwarding on your router and ensure your Raspberry Pi has a static IP address. Additionally, use a secure method like a dynamic DNS service to access your device from anywhere.
Q2: Is SSH the only way to remotely access Raspberry Pi?
No, there are alternatives like VNC and TeamViewer, but SSH is often preferred for its simplicity and security.
Conclusion and Next Steps
In this comprehensive guide, we've covered everything you need to know about remotely connecting to your Raspberry Pi using SSH. From enabling SSH on your device to configuring advanced features and ensuring security, you now have the tools to manage your Raspberry Pi projects remotely with confidence.
We encourage you to explore the advanced features of SSH and experiment with different configurations to suit your specific needs. Don't forget to share your experiences and tips in the comments section below. If you found this article helpful, consider sharing it with others who might benefit from it. For more tips and tutorials, explore our other articles on Raspberry Pi and remote computing.


 is a powerful way to access and control your device from anywhere in the world. Whether you're)